
Must Have Home Repair Tools for Advanced DIY-ers
Posted by by McCombs on 22nd Jul 2019
Taking Home Repair to the Next Level.
Advanced Tools All Experienced Handyman Need
More and more homeowners are getting involved in home repairs. Whether it’s painting or refinishing cabinets, today’s homeowner is starting more DIY projects than ever before. It’s probably not a surprise to hear that more and more homeowners are tackling the big jobs. More homeowners are handling the technically advanced repairs of large and small appliances, plumbing, and even HVAC.
In the world of home DIY, there are many levels of expertise. Many homeowners consider changing an HVAC air filter to be a triumph of self-sufficiency. Others are much more ambitious. These serious DIY-ers are willing to try their hands at installing electronic relays and hard start capacitors. This new breed of ultimate DIY repairmen takes the time to learn how to complete simple repairs to make small appliances last longer, but they also study mechanical home systems and units in ways that enable them to maintain and even repair the most complicated parts of their home.
If you’re on this website, reading this kind of article, it’s a good bet that you’re also ready to advance your DIY knowledge. You’re already fairly skilled at repairing home appliances, HVAC systems, and other advanced home projects. Difficult mechanical problems don’t intimidate you. You’re inspired to do more and try more. If that sounds like you, you’re ready for the kind of advanced home repair tools we’re going to discuss in this article.
The History of Home Repair
In the 1800s, most home repair could be made with a good set of hand woodworking tools. Most homeowners could figure out repairs without much effort, and without needing specialized tools. Only a hundred years ago, plumbing and electricity uncommon, and even homes with lots of appliances would be considered simplistic by today’s standards.
- The first electric refrigerator wasn’t introduced until 1923.
- The first automatic, pop-up toaster wasn’t manufactured until 1929.
- The first electric dishwasher wasn’t invented until 1929.
- The first electric dryer wasn’t introduced until 1938.
- And while the room air conditioner was introduced in 1931, it wasn’t until the 1970s that central heating and cooling systems began rolling out in the United States.
In just a few decades, we’ve welcomed so many complex inventions and innovations into our dwellings that there are now thousands of parts integrated into today’s modern home. And each house has difference appliances than their neighbors. In fact, there are thousands of different models of appliances on the market, and millions of corresponding parts. No matter how large or how small your residence is, if you have plumbing and electricity, you probably have large and small appliances, and that means you have wires, cables, cords, tubes, meters, pipes, motors, blades, compressors, valves, circuit breakers, switches, and other parts to maintain.
It’s easy to see why learning the basics of appliance maintenance and repair is smart and economical. If you understand how machines work, the role of electricity and gas, the basic structure of compressions units, and the importance of vents and hoses, you’re ready to start taking on bigger and more complicated home repairs.
Take on the Challenge - Advanced DIY
Many people are intimidated or confused by the technology in their homes. Not so for the advanced DIY homeowner. While they may leave some maintenance and repairs to the professionals, the advanced DIY homeowner has a knack for fixing things. Some of these skilled handymen adapted skills were learned on a job in a related field. Others were born with an engineer’s brain and enjoy taking things apart and putting them back together, better than before. Others are driven by practicality and want to DIY to save money and to extend the life of their home appliances.
With the right attitude, a few useful websites, and the right tools, advanced DIY repairmen are able to tackle an endless list of home repairs on their own. And the more they fix, repair, or upgrade, the more comfortable and skilled they become. What starts as a simple fix on a small appliance will grow into a full-blown obsession. There is immense satisfaction in figuring out complicated problems, and the people lucky enough to have these DIY-ers in their life appreciate their determination and skill.
How do you Know if you’re an Advanced Home Repairman?
What’s the difference between an advanced DIY-er and a regular weekend warrior? Ask yourself these questions:
- Do you own more than 100 tools?
- Do you have more than three home projects lined up this month?
- Do strangers ask you home improvement questions in the hardware store?
- Do you get misty-eyed when you see an oversized roller-wheeled toolbox?
If you answered yes to any of those questions, you’re probably in the most advanced category of DIY homeowner, and that means you are usually up for tackling big, complicated projects.
If you’re comfortable with advanced-level home improvements and repairs, you’ve already got the standard tool kit, and probably have duplicates of many items, including hammers, wrenches, pliers, screwdrivers, screwdriver handle and bits, a nut driver bit set, steel and masonry drill sets, wrenches, Allen wrenches, clamps, vice grips, levels, tape measures, saws, hacksaws, circular saws, power drills, hammer drills, ladders, nail guns, and much more.
This article focuses on some of the tools you might not have yet, but that can help you do more to keep your home up and running longer for less.
Invest in the Right Tools
Most DIY warriors eventually want to take it up a notch and outfit their home shop spaces with professional-grade tools with lots of practical, home applications. After all, any job becomes difficult, even impossible, without the right specialized tool.
When it comes to DIY home appliance repair, the tools you need can be unusual or even hard to find. That’s why it’s good to have a commercial resource like McCombs Supply Co., Inc. to help you direct-order parts like refrigerator shelves, vents for stoves, and even knobs for a dishwasher.
Once you are ready to take on regular maintenance or repairs, you will need to use specialized tools or tool kits for each appliance or task, so don’t be afraid to expand your collection as time goes on. Some of those tools can be hard to find, but at McCombs Supply, we’ve got some ideas on where to start.
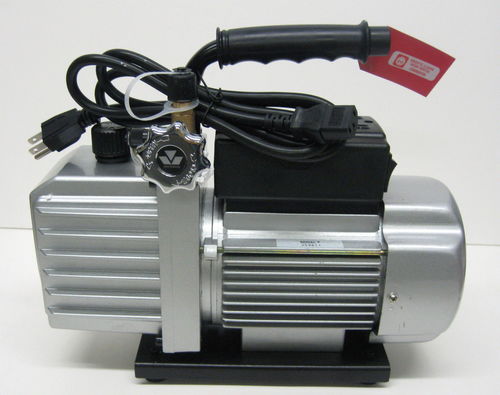
MUST HAVE TOOL: The Two-Stage Vacuum PumpWhen you’re dealing with compressors, precision counts. This specialized tool is built to provide exceptionally targeted and complete suction to help clean out compressors in cooling technology like refrigerators and HVAC units. When you need to make sure your compressor or tubes are absolutely clean of moisture and debris, you must use something with real power and precision. That’s why a 2-stage vacuum pump is the tool for the job. At its most basic, a vacuum pump moves air into or out of something else. 2-stage vacuum pumps have two rotors and two sets of vanes. 2-stage pumps produce a deeper vacuum than single stage pumps. Vacuum pumps are often part of one of the repair process, especially when you need to completely remove gasses, air, or water from tanks, tubes, or piping. In projects with a wide margin of error, where details are not critical, you might use a wet vac to vacuum out tubes or pipes. But in projects with low margins of error, especially when dealing with compressors in refrigeration and HVAC repair, it’s vital that these kinds of systems are genuinely free of even tiny bits of solids, liquids, or even gasses. Even minuscule particles left in the system, leave behind damaging impurities, even causing short circuits in compressors.
|
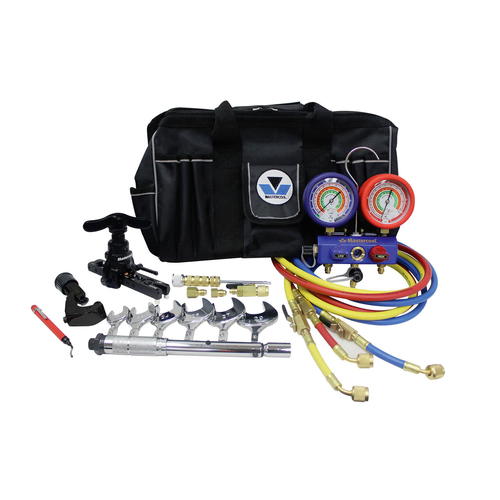
MUST HAVE TOOL: The Mastercool Mini Split KitSome home repair projects require very specific parts and tools. Repairing a Mini Split HVAC unit is just such a project. When you’re ready to tackle repairs on your Mini Split HVAC, you’ll need a set of task-specific equipment that can be hard to find at the corner hardware store or even at larger home centers. Mini Split systems are popular because they allow you to control the temperatures in individual rooms or spaces. These HVAC units have two main components; an outdoor compressor/condenser and an indoor air-handling unit(s) (also called an evaporator). The mini-split kit from Mastercool was designed to provide all of the right tools to repair virtually any Mini-Split unit on the market.
|
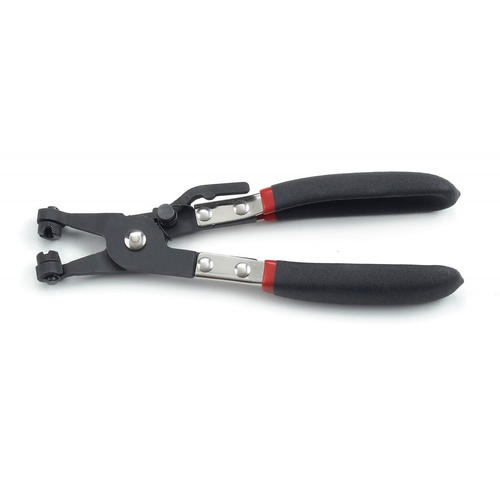
MUST HAVE TOOL: Pliers for Corbin ClampsHoses have all kinds of connectors and clamps, and most can be handled with standard wrenches and pliers. However, the Corbin clamp is a notable exception. A Corbin clamp is a spring-style, metal clamp that continues to stay tight even as the hose shrinks or gets worn. Corbin clamps are most well-known for use in classic automobiles, but HVAC and home appliances still use these types of clamps. Corbin clamps are tough to grip and hard to loosen. Removing or replacing a Corbin clamp can be tricky unless you have the right tools. The GearWrench Corbin Style Hose Clamp Pliers is a highly specialized tool that provides the dual grip you need to secure your hold on both prongs of the clamp. An easy-to-use locking feature will lock your clamp in place. The tip can trap and hold the clamp, allowing you to slide the tip of the pliers around the clamp’s prongs, making it easy to grab the elusive Corbin clamp. And this tool swivels, so you can access the hose and the Corbin clamp from multiple angles.
|
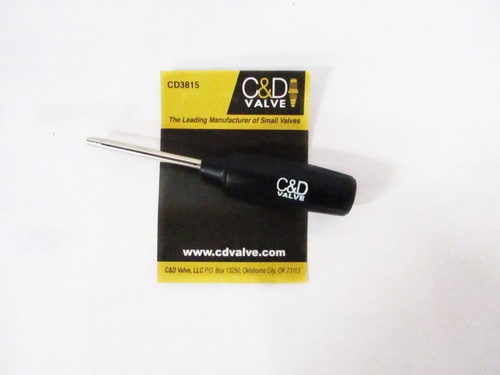
MUST HAVE TOOL: Valve Core Remover and InstallerFixing valves might seem easy, but unless you have the right tools, this job can be almost impossible. When it’s time to repair items with valves, you need a remover and installer specially built for the job. Use this tool to remove the valve core (the part within a value that maintains pressure) on a tire or any pressurized chamber with a valve.
|
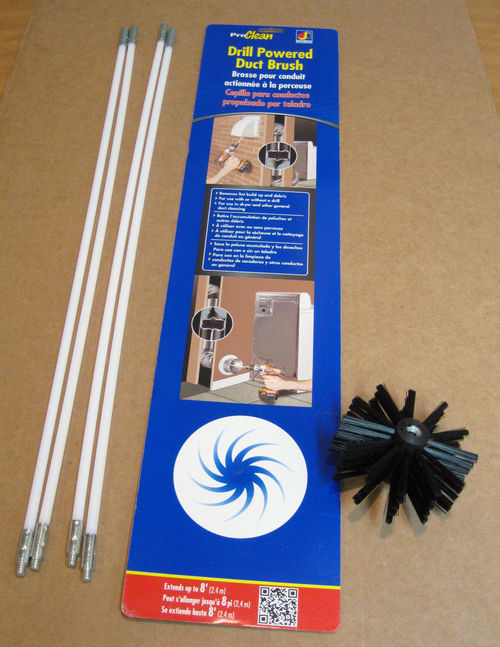
MUST HAVE TOOL: Flexible Duct Brush, with Power Drill OptionClogged dryer vents are one of the most common causes of dryer failure. But keeping vents free of lint can be tough, especially if you have a long or complicated venting system attached to your dryer. In fact, these kinds of vents often get clogged because homeowners didn’t realize how long the vent actually was. Now you can easily keep all types of ducts and vents clean and free of debris. Even if your dryer isn’t failing, many other types of tubes, vents, and hoses also need cleaning periodically. And no matter what the manual says, no dryer can catch all lint. Every dryer models allow some lint gets past the link trap, and without proper maintenance, eventually all dryer vents, hoses, or tubes become clogged. The Dundas Jafine's Drill Powered Duct Brush comes with a nylon-bristled brush that you can use with a rod to manually clean a vent or tube. You may attach the brush and rods to a power drill for faster rotations, ease of use, and more speed. The Drill-Powered Duct Brush Kit includes a soft-bristled nylon brush head and a set of four flexible rods that can be used together to extend your reach up to eight feet. The nylon rods are flexible enough to allow for 90 degree turns inside the tubes or vents.
|
MUST HAVE TOOL: Portable Workshop LightNobody can do a proper repair job if they can’t see what they’re doing. However, few appliances reside in spots full of bright light available from every angle. When you need a blast of light that you can place close to your working area, you need a portable light. Portable shop lights are nothing new. You probably remember your parent using one 30 years ago in their garage. While you might already have some portable lighting in your workshop, you are missing out until you try this high-powered, super flexible light. This Portable Workshop Light is one of the best. This fine Supco product was designed to perform in a range of environments and is able to withstand the kind of harsh conditions and dirty spaces common in workshops. The light’s adjustable power switch allows you to choose the brightness that works best for your project. And the rechargeable lithium battery allows you to run a COB LED array (850% brighter than an SMD LED) for up to 10 hours, depending on the setting. The swivel and stay base features a 20 lb. removable magnet, so it stays when you want it to stay, and goes when you want it to go. When you need a lot of intense light to get the job done, this is one of the brightest, most flexible workshop lights available.
|
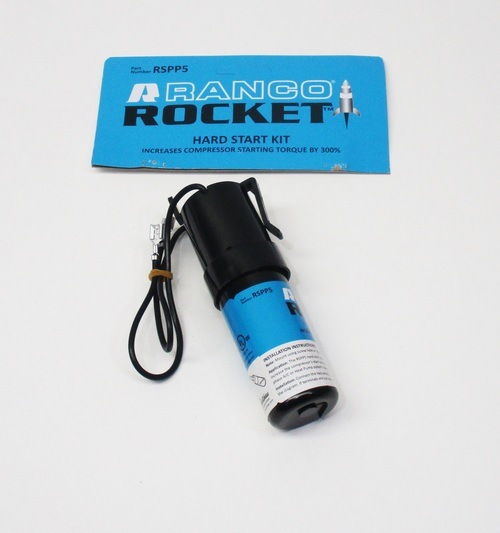
MUST HAVE TOOL: HVAC Hard Start KitsHVAC units are one of the most expensive parts of your home. Not only are they the priciest appliance or machine to replace in your home, but you also spend hundreds, maybe thousands, of dollars a year to run your heating and cooling systems. That’s why homeowners not only want to keep their units running longer, they also want them to run more efficiently. Many things affect the life of your heating and cooling unit, but did you know that one of the things that wear it down most quickly is its own on and off switches? If you want to do everything you can to get your HVAC to perform at top efficiency while protecting and extending the life of your air conditioning and heating unit, you might be ready for a hard start kit. When your air conditioning, heating, or refrigeration units measure and maintain temperatures throughout the day, they need to turn off when the temperature gets too hot or cool, so they don’t overwork, and to allow your home to remain at the desired temperature. Once the switch is “off,” the unit lets air heat up (or cool off) on its own. Once the air gets a little warmer (or cooler), the unit switches on when it’s time to regulate the temperature. Since the units are working to maintain a very narrow range of temperatures, these units are turning off and on all day long. When the unit needs the compressor to “power up,” it begins the energy-intensive cooling/heating process. However, did you know that the process of starting a compressor requires four to eight times more electric current than running it continuously? Over time, these constant starts and stops are one of the most wearing functions for a compressor. When you install a relatively inexpensive hard start kit, you’re giving the compressor added power when it turns on, which reduces the amount of electricity required. It reduces the amount of power needed so dramatically that the addition of a hard start kid can increase energy efficiency by up to 98%. Hard start kits also extend the life of your compressor and components.
|
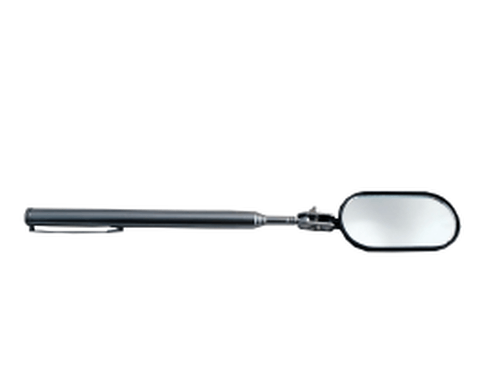
MUST HAVE TOOL: Telescoping Inspection MirrorLet’s face it. The appliances and machines in our home are packed full of hard-to-reach spaces. Inspection mirrors are a common tool for mechanics, but they are also smart tools to have when it comes time to work on almost any kind of appliance or HVAC system. The small, flexible mirror will enable you to inspect different parts of the appliance without dissembling it. This little mirror may save you loads of time because you won’t have to take apart appliances or HVAC systems just to examine the problem. This handy tool also includes an LED light, so you can light up small spaces. While this inspection mirror may be able to save you hours on a project, it also happens to be small and inexpensive. This model features telescoping tools that can expand out to 28 inches, a match clip, a magnet, and handy inspection mirrors.
|
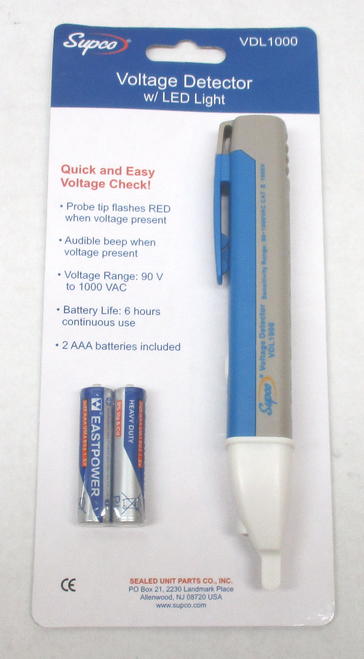
MUST HAVE TOOL: Pocket Clip Voltage DetectorWhenever you work with electricity, you must be extremely cautious. Big shocks can cause serious injury, even death. Anyone who has worked with wiring and electricity has felt the nervousness of testing voltage. That’s why a small, portable voltage detector may become your favorite new tool. Hold it in front of cables, cords, circuit breakers, lighting fixtures, switches, wires, and more, and it will detect AC voltage. The built-in LED light makes it easier to work in shadows and darker spaces. This voltage detector also helps track down breaks in circuits and can locate breaks along insulated wires and power cords. This Voltage Detector with LED is appropriate for residential, commercial, and industrial applications.
|
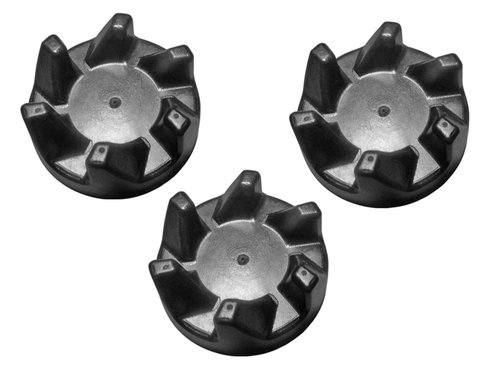
MUST HAVE TOOL: Blender CouplingMost kitchens have many small appliances, from toasters to blenders. You can get them inexpensively, or you can invest in a good brand that should last years. However, many homeowners treat their appliances as disposable, no matter how much they paid for them. Once these pricey appliances break down, the careless homeowner usually throws them out without another thought. But advanced DIY repairmen know that many small appliance failures are easy and inexpensive to fix. With a few simple repairs now and then, many appliances can last decades. Blenders are often more expensive than other small appliances. After all, a good blender can cost hundreds of dollars. That’s why it’s smart to make sure your blender will last as long it can. The blender coupling is the part that transfers power from the blender's motor to its blades. Because the coupling is the part that makes contact to transfer power, it is also the part that absorbs stress and friction as it spins the blades, and it’s the part that often wears out first. When a blender’s couplings wear down, they can’t engage with the blade assembly. This results in a grinding sound. When couplings wear out, the blender's blades can’t spin. Replacing a coupler is quick and easy. It’s a smart way to avoid a repair shop bill or the cost of a new blender.
|

Tips For Advanced DIY Home Repair
Want to get better at repairing the large and small appliances in your home? Ready to dig and start working on the mechanics and moving parts of your house? While advanced DIY maintenance and repair can be rewarding, there are a few things to keep in mind before you dig into your next project. Here are a few tips to get you started.
Make Sure You Start With the Basics.
How many times has an appliance “not worked” because it was unplugged? Have you ever started fixing an appliance that turned out to be switched off? The first thing any good DIY repairman does is to make sure all the basics are covered before taking anything apart. So, start any project by checking all the power settings. Make sure your appliance or HVAC is hooked up properly, is getting power, and is turned on. And make sure the outlet is getting power. (Unreliable outlets or switched breakers are often at fault.) Some types of appliances may work improperly (or not at all) if they are placed on an uneven surface, or they are not correctly balanced. If your appliance has a filter, make sure it is clean, since dirty filters can cause a machine to overheat. If the unit has a fan, make sure the fan vent is free of debris (vents in dryers and hair dryers often become clogged.) You’ll save a lot of time and money when you start with the basics.
Check the Ignition Process
When you start working with gas-powered appliances and systems, you’ll quickly learn that these types of units use an ignition process to get started. These machines can have two types of starters: an electric or electronic starter or a pilot light. Most commonly, older gas furnaces, boilers, and water heaters still utilize a basic standing pilot ignition system. Newer models of all types of gas-powered appliances have moved to an electronic ignition. As the name implies, standing pilot gas furnaces require that the pilot light stays lit to function. Electric or electronic starters will automatically light the pilot and extinguish it, for additional safety and to save energy.
No matter which starter type you’re working with, failures in the ignition process are common issues for otherwise durable appliances and systems. Check the ignition process and make sure the pilot light is on, the starters are properly aligned, and that nothing has been blocked. Exercise care with all gas appliances, since failures in the pilot light can cause a dangerous gas buildup.
Research Which Moving Parts Fail First
If the power source is working, and the appliance is properly turned on, the next most likely culprit is a failure in the moving parts. As appliances and systems age, their moving parts are often the most likely to fail due to wear or malfunction. With a little research, you’ll quickly track down which moving parts to check first. For example, as explained above, a Blender Coupling is the part that fails most commonly in a blender. Once you know this, you’ll check the coupling first. Replacing the blender coupling is a quick, easy fix, but if you don’t understand which parts fail first, you might have spent a lot of time examining the wiring. Noisy or unbalanced fans are another common failure in appliances. Once you know how to ensure that fans work correctly, you’ll significantly reduce repair time on most types of small and large appliances and systems.
Check the Hoses
Hoses are a key part of almost any major appliance. Hoses move air and liquids in, out, and through all kinds of appliances and machines, including washers, dryers, dishwashers, vacuums, stoves, refrigerators, HVAC systems, and more. And hoses tend to be one of the first parts of the machine to wear out.
These hoses may use a variety of methods to secure or fasten including threaded inlets, couplets, Corbin clamps, tape, or resistance and pressure. No matter which type of hose and fastening they require, these machines rely on their hoses to function properly. Leaks, cracks, compromised valves and connectors, broken seals, or even kinks can make a machine inoperable. That’s why the next stage for the advanced DIY repairman is to check the hoses. If you identify an issue, come to McCombs supply find the right replacement hose or connector quickly. And remember that some types of hoses, clamps, and connectors are difficult to remove or replace, so invest in job-specific tools to get the repair done right.
Replace Seals and Gaskets
Seals and gaskets need regular replacing. You’ll find them in all kinds of appliances but pay special attention to those found on oven and refrigerator doors. When you replace damaged or cracked seals or gaskets you may also resolve other, larger issues on your appliance (like inadequate heating or cooling.)
Get Familiar with Compressors and the Refrigerant Cycle
Refrigerant is present in many appliances, including heat pumps, air conditioners, and refrigerators. It’s helpful to understand the refrigerant cycle, how it works, and what can go wrong. Many appliances and units contain refrigerant that changes low-pressure gas into a cold, high-pressure liquid using a system of vents and fans. It’s smart to learn the path refrigerant takes in your appliances and units, and learn how the evaporator, compressor, and condenser all work together. With this knowledge in hand, you’ll be able to make many types of repairs. However, only licensed heating, ventilation, and air conditioning (HVAC) companies and technicians can purchase refrigerant, so if you detect a leak or similar problem, you may need to work with a licensed technician to repair it.
You Can Do it!
Advanced home DIY is not for everyone. But if you’ve got a knack for repairs, and you want to tackle bigger projects, with a little research, an eye towards safety, and the right parts and tools, you should be able to complete the kind of maintenance and repairs other homeowners won’t even consider. We salute you!